在使用 python-docx 時,我們通常習慣使用 doc.paragraphs 讀取段落,或用 doc.tables 讀取表格。但這有一個致命缺點:你無法知道段落和表格在文件中的「先後順序」。
為了解決這個問題,我們必須直接遍歷底層的 XML 結構(doc.element.body),拿到原始的 CT_P (段落) 和 CT_Tbl (表格) 元素。這些原始元素雖然能讀取文字,但其樣式屬性僅反映 XML 字面值(即內部 ID),且缺乏『預設值回退機制』(例如省略的 Normal 會讀作 None),操作上遠不如具備完整封裝邏輯的高階物件直覺。
這篇教學將示範如何將這些底層元素「封裝」回好用的 Python 物件。
核心概念
CT_P: 底層段落元素 (Complex Type – Paragraph)。CT_Tbl: 底層表格元素 (Complex Type – Table)。- 封裝 (Wrapping): 使用
Paragraph(element, parent)和Table(element, parent)將底層元素變回高階物件。
Jupyter Notebook 實戰程式碼
請複製以下程式碼到你的 Jupyter Notebook 中執行。
這段程式碼會自動生成一個測試用的 Word 檔,然後示範如何讀取它。
import os
from docx import Document
from docx.oxml.text.paragraph import CT_P
from docx.oxml.table import CT_Tbl
from docx.text.paragraph import Paragraph
from docx.table import Table
# ==========================================
# 第一步:生成測試用的 Word 文件
# ==========================================
def create_demo_docx(filename=r"D:\Temp\demo_structure.docx"):
doc = Document()
# 1. 加入標題 (Heading 1)
doc.add_heading('這是標題一', level=1)
# 2. 加入普通段落 (Normal)
p = doc.add_paragraph('這是第一段普通文字。')
p.style = 'Normal'
# 3. 加入一個表格 (Table Grid)
table = doc.add_table(rows=2, cols=2)
table.style = 'Table Grid'
table.cell(0, 0).text = "表頭A"
table.cell(0, 1).text = "表頭B"
table.cell(1, 0).text = "數據1"
table.cell(1, 1).text = "數據2"
# 4. 再加入一個段落 (Quote)
p2 = doc.add_paragraph('這是結尾的引用文字。')
p2.style = 'Quote'
doc.save(filename)
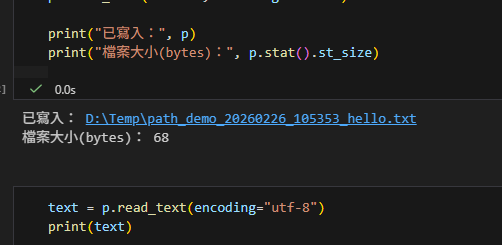
print(f"✅ 測試文件已生成: {filename}")
return filename
# 生成文件
docx_file = create_demo_docx()
# ==========================================
# 第二步:遍歷底層並封裝物件
# ==========================================
print("\n🚀 開始遍歷文件內容 (依照出現順序)...\n")
# 1. 讀取文件
doc = Document(docx_file)
# 2. 遍歷 body 中的所有子元素
# doc.element.body 包含了文件中所有的內容元素,依照順序排列
for child in doc.element.body:
# --- 情況 A: 遇到段落 (CT_P) ---
if isinstance(child, CT_P):
# 【關鍵操作】將 CT_P 封裝成 Paragraph 物件
# 參數 1: child (底層 XML 元素)
# 參數 2: doc (作為 parent,提供樣式等上下文)
para = Paragraph(child, doc)
print(f"[段落] 文字內容: {para.text}")
print(f" 樣式名稱: {para.style.name}")
print(f"[段落] 文字內容by CT_P: {child.text}")
print(f" 樣式名稱by CT_P: {child.style}")
# --- 情況 B: 遇到表格 (CT_Tbl) ---
elif isinstance(child, CT_Tbl):
# 【關鍵操作】將 CT_Tbl 封裝成 Table 物件
# 參數 1: child (底層 XML 元素)
# 參數 2: doc (作為 parent)
table = Table(child, doc)
# 封裝後就可以像平常一樣操作表格了
first_cell_text = table.cell(0, 0).text
row_count = len(table.rows)
print(f"[表格] 第一格內容: {first_cell_text}")
print(f" 總行數: {row_count}")
print(f" 樣式名稱: {table.style.name}")
# --- 情況 C: 其他元素 (如分節符號等) ---
else:
print(f"[其他] 發現未處理的元素類型: {type(child)}")
print("\n✅ 遍歷完成!")
# 清理生成的測試檔案 (可選)
# os.remove(docx_file)
比對生成的docx內容:

程式碼解析
doc.element.body:
這是存取 XML 樹狀結構的入口。它是一個列表,包含了文件中所有直接位於<body>標籤下的子節點。這保證了我們讀取的順序與文件視覺上的順序一致。isinstance(child, CT_P):
我們使用isinstance來判斷當前遍歷到的 XML 節點是什麼類型。CT_P代表段落,CT_Tbl代表表格。Paragraph(child, doc):
這是最神奇的一步。child是冷冰冰的 XML 節點,只有 XML 屬性。doc是整個文件物件,它持有樣式表(Styles Part)和資源關聯(Relationships)。- 將兩者結合,我們就得到了一個活生生的
Paragraph物件,此時.text會自動解析 XML 中的所有<w:t>標籤,.style.name也能正確查找到樣式名稱。
常見問題
Q: 為什麼 parent 一定要傳 doc?
A: 因為 Paragraph 和 Table 物件在讀取樣式(Style)或圖片(Blip)時,需要向上查找文件結構。如果沒有傳入 doc 作為 parent,當你嘗試存取 para.style 時可能會報錯,或者無法正確解析樣式繼承。
Q: 這種方法能讀取 Header 和 Footer 嗎?
A: 不行。doc.element.body 只包含正文。Header 和 Footer 位於不同的 XML Part 中,需要透過 doc.sections[0].header 進入。
推薦hahow線上學習python: https://igrape.net/30afN
 函数方法的使用; df1.astype( dtype = np.float64, errors = “ignore”)")


![Excel TQC考題202: 快樂小學學生名冊,自訂格式:0″公斤”;[紅色]”減”0″公斤”;[藍色]”完美身材”](https://i0.wp.com/savingking.com.tw/wp-content/uploads/2022/04/20220410142405_70.png?quality=90&zoom=2&ssl=1&resize=350%2C233 "Excel TQC考題202: 快樂小學學生名冊,自訂格式:0″公斤”;[紅色]”減”0″公斤”;[藍色]”完美身材”")

 #zinfo_or_arcname: ZipInfo | str ; data: bytes | str")
 ; from sklearn.tree import DecisionTreeClassifier ; tree = DecisionTreeClassifier(criterion = “gini”) #criterion = “entropy” #criterion: 標準,準則")
 : from openai import OpenAI ; client = OpenAI (api_key = api_key) ; response = client .audio .speech .create( model= “tts-1-hd”, input= text_content, response_format= “mp3”)")
 or(|) xor(^) not ; assert 預期為真的條件式, “錯誤訊息” ; 條件式為真的話,繼續往下跑,否則AssertionError: “錯誤訊息”")

近期留言