在過去,處理檔案路徑和更名時,我們習慣使用 os 模組(如 os.path.join 和 os.rename)。但自從 Python 3.4 引入 pathlib 後,我們有了更直觀、物件導向的選擇。
pathlib.Path.rename() 方法非常強大,它不僅能像 os.rename() 一樣更改檔名,還能直接移動檔案。
以下教學將示範如何在 Jupyter Notebook 環境中驗證這些操作。
1. 環境準備:建立測試檔案
首先,我們需要在 Jupyter Notebook 中建立一個測試環境,包含一些假檔案和資料夾,這樣你才能實際看到效果。
from pathlib import Path

# 設定基礎目錄 (在當前工作目錄下建立一個 'demo_playground' 資料夾)
base_dir = Path("./demo_playground")
# WindowsPath('demo_playground')

# 如果目錄存在先忽略錯誤,不存在則建立
base_dir.mkdir(exist_ok=True)

# 建立一個測試檔案
source_file = base_dir / "old_name.txt"
source_file.write_text("Hello, pathlib!", encoding="utf-8")

# 建立一個目標資料夾 (稍後移動用)
target_folder = base_dir / "archive"
target_folder.mkdir(exist_ok=True)

print(f"✅ 測試環境已建立:\n1. 檔案: {source_file}\n2. 資料夾: {target_folder}")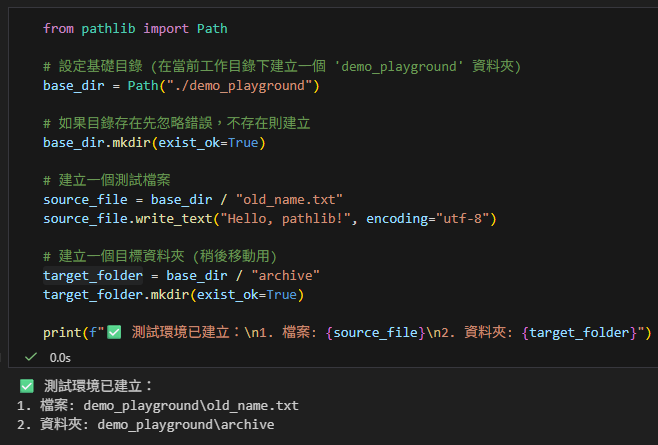
2. 作用一:檔案更名 (Renaming)
傳統上我們用 os.rename(src, dst),現在我們使用 Path 物件的 .rename() 方法。
核心概念:你必須定義一個「新的路徑物件(包含新檔名)」,然後叫舊的檔案變成那個新的樣子。
# --- 定義舊檔案路徑 ---
old_file = base_dir / "old_name.txt"

# --- 定義新檔案路徑 (路徑相同,只有檔名不同) ---
# .with_name() 是一個很方便的方法,它會保留路徑,只替換檔名部分
new_file = old_file.with_name("new_name.txt")
# WindowsPath('demo_playground/new_name.txt')

# --- 執行更名 ---
if old_file.exists():
    old_file.rename(new_file)
    print(f"✅ 成功更名!\n原檔名: {old_file.name}\n新檔名: {new_file.name}")
else:
    print(f"❌ 找不到檔案: {old_file}")

# 驗證
print(f"新檔案是否存在? {new_file.exists()}")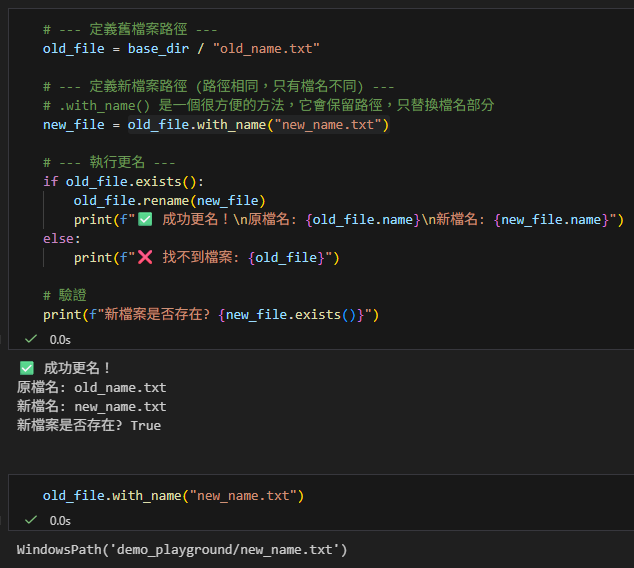
3. 作用二:移動檔案 (Moving)
os.rename 的另一個常見用途是移動檔案。在 pathlib 中,邏輯完全一樣:只要你的「新路徑」指向不同的資料夾,.rename() 就會執行移動操作。
# --- 定義目前的檔案 (剛才改名後的 new_name.txt) ---
current_file = base_dir / "new_name.txt"

# --- 定義目標路徑 (指向 archive 資料夾內部) ---
# 注意:這裡必須包含完整的檔名,不能只寫資料夾路徑
destination = target_folder / "moved_file.txt"

# --- 執行移動 ---
if current_file.exists():
    # 這裡的 rename 實際上執行了 "Move"
    current_file.rename(destination)
    print(f"✅ 成功移動!\n從: {current_file}\n到: {destination}")
else:
    print(f"❌ 找不到檔案: {current_file}")

# 驗證
print(f"原位置還有檔案嗎? {current_file.exists()}")
print(f"新位置有檔案嗎? {destination.exists()}")4. 進階技巧:replace() vs rename()
雖然 rename() 很好用,但在 Python 3.8 之前,跨平台行為(Windows vs Unix)在處理「目標檔案已存在」的情況時不一致。
為了更明確的行為,pathlib 提供了 .replace():
.rename(target): 目標如果存在,在 Windows 上可能會報錯FileExistsError。.replace(target): 無論目標是否存在,都會強制覆蓋(更像 Unix 的mv指令)。
安全移動範例 (強制覆蓋):
# 再次建立一個檔案來測試覆蓋
dummy_file = base_dir / "temp_data.txt"
dummy_file.write_text("New Data")

# 目標位置已經有一個檔案了 (剛剛移動過去的 moved_file.txt)
target_file = target_folder / "moved_file.txt"

print(f"移動前目標內容: {target_file.read_text()}")

# 使用 replace 強制移動並覆蓋
dummy_file.replace(target_file)

print(f"✅ 強制覆蓋移動完成")
print(f"移動後目標內容: {target_file.read_text()}") # 內容應該變成 "New Data"
總結
使用 pathlib 取代 os.rename 的三個理由:
- 語意清晰:
path / "filename"的寫法比os.path.join直觀太多。 - 方法鏈接:可以使用
.with_name()或.with_suffix()快速產生新路徑,不需要手動切字串。 - 物件導向:所有的操作都綁定在
Path物件上,程式碼可讀性更高。
下次需要整理檔案時,試試看 pathlib 吧!
推薦hahow線上學習python: https://igrape.net/30afN
1. .with_name():更換完整檔名
它的作用是替換路徑的最後一部分(basename),也就是把「主檔名 + 副檔名」整個換掉,但保留前面的目錄路徑。
- 語法:
Path.with_name("新檔名.副檔名") - 注意: 如果原始路徑只是根目錄(例如
/),使用此方法會報錯,因為沒有「name」可以替換。
from pathlib import Path

p = Path("/home/user/downloads/photo.jpg")

# 把 photo.jpg 換成 image.png
new_p = p.with_name("image.png")

print(new_p)
# 結果: /home/user/downloads/image.png
2. .with_suffix():更換(或新增/刪除)副檔名
它的作用是只修改最後一個點(.)之後的部分。
- 語法:
Path.with_suffix(".新副檔名") - 關鍵細節: 傳入的參數必須包含點(
.),否則會變成沒有點的怪異結尾。
常見情境範例:
from pathlib import Path

p = Path("/home/user/data.csv")

# 情境 A:更換副檔名
print(p.with_suffix(".txt"))
# 結果: /home/user/data.txt

# 情境 B:刪除副檔名 (傳入空字串)
print(p.with_suffix(""))
# 結果: /home/user/data

# 情境 C:原本沒有副檔名,會變成新增
p2 = Path("/home/user/readme")
print(p2.with_suffix(".md"))
# 結果: /home/user/readme.md
3. .with_stem():更換(或新增/刪除)主檔名
# %%
from pathlib import Path

p = Path("/home/user/music/song.mp3")

# 情境:只改檔名,不改副檔名 (保留 .mp3)
new_p = p.with_stem("song_remix_v2")

print(new_p)
# 結果: /home/user/music/song_remix_v2.mp3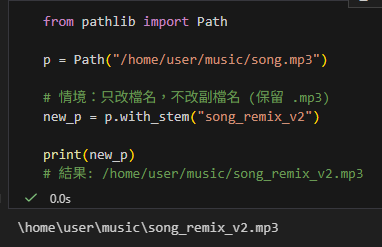
綜合比較圖表
假設原始路徑是:p = Path("folder/report.old.txt")
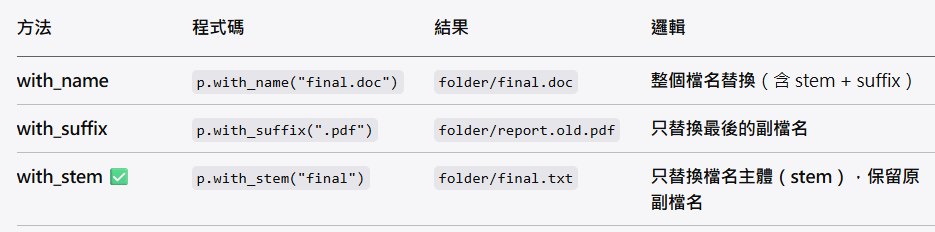
Path.with_name("新檔名.副檔名")   # 更改整個檔名(basename,含副檔名)
Path.with_stem("新檔名")          # 更改檔名主體(stem),保留原副檔名
Path.with_suffix(".新副檔名") # 更改副檔名(只影響最後一個 suffix)小提醒
這兩個方法都不會真的去改硬碟上的檔案,它們只是產生一個新的路徑字串物件。如果你要改名,最後記得要執行 .rename():
old_file = Path("old.txt")
new_file = old_file.with_name("new.txt")

# 這一步才會真的在硬碟上改名
old_file.rename(new_file)推薦hahow線上學習python: https://igrape.net/30afN
 ; dot.attr(rankdir=’TB’, size=’10,15′) #”TB”: Top to Bottom, 從上而下的佈局")
")
 ; 如何獲取pandas.DataFrame多層索引MultiIndex中的第二層內容? df.columns.get_level_values(1).unique()")
![Python: 使用 flat_list.extend( List[pandas.Series] ) 實現 pandas.DataFrame 列擴展教學](https://i0.wp.com/savingking.com.tw/wp-content/uploads/2025/04/20250421141348_0_14cedf.png?quality=90&zoom=2&ssl=1&resize=350%2C233 "Python: 使用 flat_list.extend( List[pandas.Series] ) 實現 pandas.DataFrame 列擴展教學")


,插入>快速組件>功能變數>StyleRef")
 vs 深拷貝(deep copy),什麼時候需要用深拷貝? import copy ; b = copy.deepcopy(a)")


近期留言