Google Cloud Vision API 是一個功能強大的影像分析服務,可以用來做 文字辨識 (OCR)、物件偵測、標籤分類、臉部偵測 等。
這篇文章會帶你從 下載憑證檔 開始,到用 Python 成功呼叫 Vision API。
🔑 一、建立憑證檔(Service Account Key)
- 登入 Google Cloud Console
- 建立一個專案(如果還沒有的話)
- 啟用 Vision API:
- 前往 API 與服務 > 程式庫
- 搜尋 Vision API → 點選啟用
- 建立 Service Account:
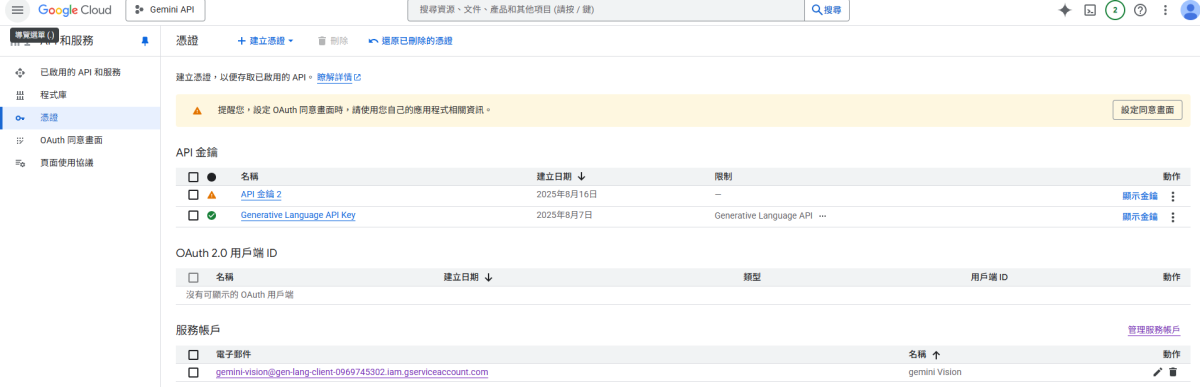
- 前往 IAM 與管理 > 服務帳戶
- 建立新服務帳號,給它一個名稱(例如
vision-sa) - 權限選擇 專案 > 編輯者(測試用,正式環境應給最小權限)
- 建立金鑰:
- 點選剛剛的服務帳號 → 金鑰 > 新增金鑰 > JSON
- 下載下來的檔案就是 憑證檔(例如
vision-key.json)
⚠️ 請務必保護好這個檔案,不要上傳到 GitHub 或公開分享。
前往 IAM 與管理 > 服務帳戶
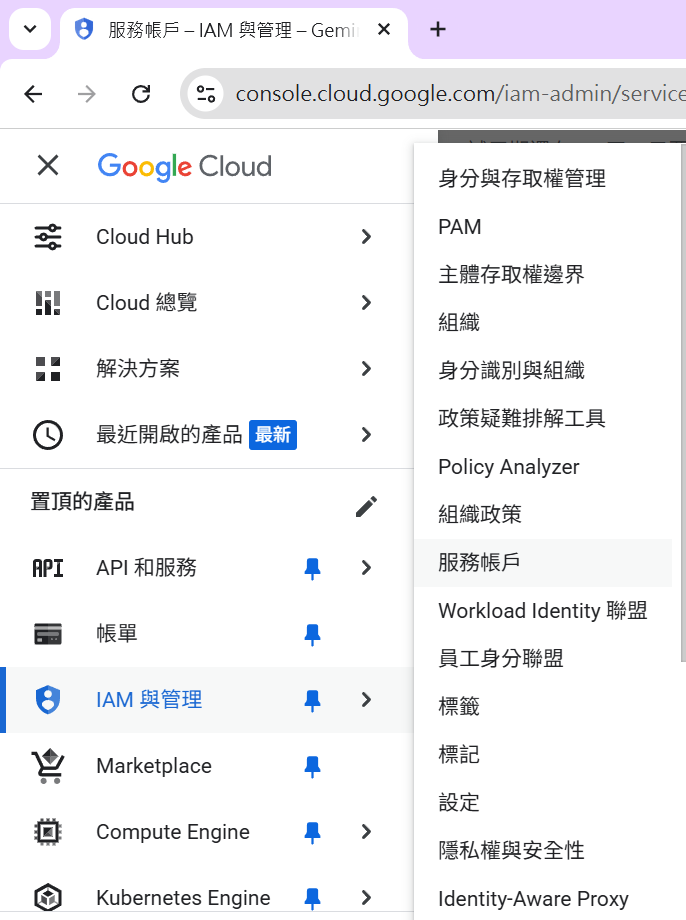
建立服務帳戶後:
🐍 二、安裝 Python SDK
pip install google-cloud-vision📂 三、設定憑證來源
有兩種方式可以使用憑證檔:
方式一:用環境變數指定檔案路徑(建議)
import os
from google.cloud import vision

# 指定憑證檔路徑
os.environ["GOOGLE_APPLICATION_CREDENTIALS"] = "/absolute/path/to/vision-key.json"

client = vision.ImageAnnotatorClient()方式二:直接在程式中指定金鑰檔案
from google.cloud import vision

client = vision.ImageAnnotatorClient.from_service_account_file("vision-key.json")方式三:將檔案讀取為dict,再使用dict的內容:
from google.cloud import vision
import json
service_account_info = json.loads("你的json金鑰字串")
client = vision.ImageAnnotatorClient.from_service_account_info(service_account_info)service_account_info:

vision.ImageAnnotatorClient.from_service_account_info
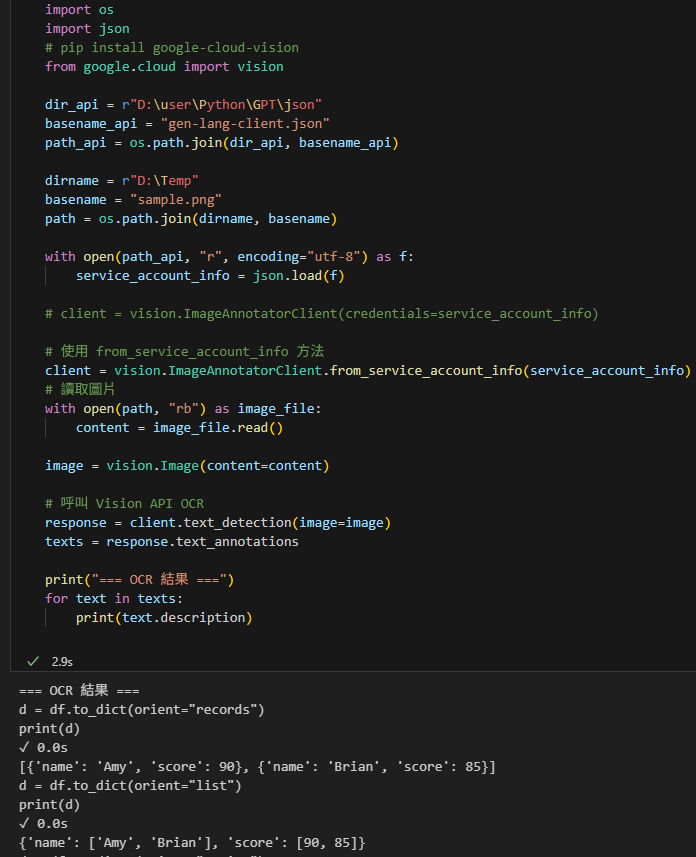
import os
import json
# pip install google-cloud-vision
from google.cloud import vision
dir_api = r"D:\user\Python\GPT\json"
basename_api = "gen-lang-client.json"
path_api = os.path.join(dir_api, basename_api)
dirname = r"D:\Temp"
basename = "sample.png"
path = os.path.join(dirname, basename)
with open(path_api, "r", encoding="utf-8") as f:
service_account_info = json.load(f)
# client = vision.ImageAnnotatorClient(credentials=service_account_info)
# 使用 from_service_account_info 方法
client = vision.ImageAnnotatorClient.from_service_account_info(service_account_info)
# 讀取圖片
with open(path, "rb") as image_file:
content = image_file.read()
image = vision.Image(content=content)
# 呼叫 Vision API OCR
response = client.text_detection(image=image)
texts = response.text_annotations
print("=== OCR 結果 ===")
for text in texts:
print(text.description)輸出:
from google.oauth2 import service_account
建立正確的認證物件
credentials = service_account.Credentials.from_service_account_file(path_api)
from google.oauth2 import service_account
from google.cloud import vision
import os
import json
# 讀取服務帳號金鑰檔案
dir_api = r"D:\user\Python\GPT\json"
basename_api = "gen-lang-client.json"
path_api = os.path.join(dir_api, basename_api)
# 圖片路徑
dirname = r"D:\Temp"
basename = "sample.png"
path_image = os.path.join(dirname, basename)
# 建立正確的認證物件
credentials = service_account.Credentials.from_service_account_file(path_api)
# 或者,如果您已經載入了JSON:
# with open(path_api, "r", encoding="utf-8") as f:
# service_account_info = json.load(f)
# credentials = service_account.Credentials.from_service_account_info(service_account_info)
# 使用認證創建客戶端
client = vision.ImageAnnotatorClient(credentials=credentials)
# 讀取圖片
with open(path_image, "rb") as image_file:
content = image_file.read()
image = vision.Image(content=content)
# 呼叫 Vision API OCR
response = client.text_detection(image=image)
texts = response.text_annotations
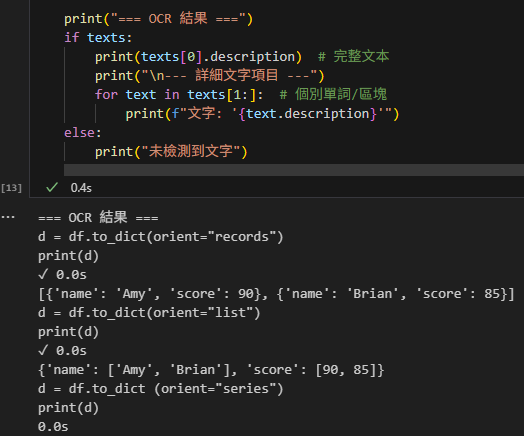
print("=== OCR 結果 ===")
if texts:
print(texts[0].description) # 完整文本
print("\n--- 詳細文字項目 ---")
for text in texts[1:]: # 個別單詞/區塊
print(f"文字: '{text.description}'")
else:
print("未檢測到文字")輸出:
📝 四、範例程式:OCR 文字辨識
假設我們有一張圖片 sample.jpg,想要辨識裡面的文字:
from google.cloud import vision

client = vision.ImageAnnotatorClient.from_service_account_file("vision-key.json")
# 讀取圖片
with open("sample.jpg", "rb") as image_file:
content = image_file.read()
image = vision.Image(content=content)
# 呼叫 Vision API OCR
response = client.text_detection(image=image)
texts = response.text_annotations
print("=== OCR 結果 ===")
for text in texts:
print(text.description)
# 錯誤處理
if response.error.message:
raise Exception(f"Vision API Error: {response.error.message}")執行後,你會看到圖片中的文字被完整輸出 🎉
📌 五、其他 Vision API 功能
- 標籤分類(幫圖片加標籤):
response = client.label_detection(image=image)
for label in response.label_annotations:
print(label.description, label.score)臉部偵測:
response = client.face_detection(image=image)
print("臉部數量:", len(response.face_annotations))Logo 偵測:
response = client.logo_detection(image=image)
for logo in response.logo_annotations:
print(logo.description)🎯 六、總結
- 在 GCP 建立專案 → 啟用 Vision API
- 建立 Service Account → 下載 JSON 憑證檔
- 安裝
google-cloud-vision - 用 Python 載入憑證 → 呼叫 API
只要跑通這幾步,你就能開始玩轉各種 Vision API 的影像分析功能 🚀
推薦hahow線上學習python: https://igrape.net/30afN

")
![Python: pandas.DataFrame如何移除所有空白列?if df_raw.iloc[r,0] is np.nan: nanLst.append(r) ; df_drop0 = df_raw.drop(nanLst,axis=0) ; pandas.isna() ;df_drop0 = df_raw.drop(nanLst,axis=0).reset_index(drop=True)](https://i0.wp.com/savingking.com.tw/wp-content/uploads/2022/12/20221206144233_67.png?quality=90&zoom=2&ssl=1&resize=350%2C233 "Python: pandas.DataFrame如何移除所有空白列?if df_raw.iloc[r,0] is np.nan: nanLst.append(r) ; df_drop0 = df_raw.drop(nanLst,axis=0) ; pandas.isna() ;df_drop0 = df_raw.drop(nanLst,axis=0).reset_index(drop=True)")

![Python socket連線出現[WinError 10049] 內容中所要求的位址不正確 cmd.exe: ipconfig/all ; TCP/IPv4 vs IPv6](https://i1.wp.com/savingking.com.tw/wp-content/uploads/2022/10/20221028151556_42.png?quality=90&zoom=2&ssl=1&resize=350%2C233 "Python socket連線出現[WinError 10049] 內容中所要求的位址不正確 cmd.exe: ipconfig/all ; TCP/IPv4 vs IPv6")
, math.pow()")


近期留言