在處理 docx(本質上是 Zip)或一般壓縮檔時,
我們最常糾結的就是:「到底該用 write 還是 writestr?」
這篇文章將透過一個可執行的 Python 腳本,
直接生成範例 Zip,並帶您理解這兩者的本質差異。
核心概念一圖流
write (硬碟搬運工):
來源:必須是硬碟上已經存在的檔案路徑。
動作:把硬碟裡的檔案「搬」進 Zip 裡。
情境:備份資料夾、打包現有專案。
writestr (記憶體魔術師):
來源:程式變數中的資料 (字串 String 或 二進位 Bytes)。
動作:直接憑空「變」出一個檔案寫進 Zip 裡,不需要先存檔。
情境:動態產生報表、修改 XML 後回寫、
從另一個 Zip 讀取資料直接轉存 (您的 DOCX 分割場景)。
實戰演練 Code
請直接執行以下 Python 程式碼,
它會建立一個測試環境並生成 demo_archive.zip。
import zipfile
import os
import time
# 1. 【環境準備】先在硬碟上建立一個真實檔案
dummy_filename = "disk_file.txt"
with open(dummy_filename, "w", encoding="utf-8") as f:
f.write("我是硬碟上真實存在的檔案內容。")
output_zip = "demo_archive.zip"
print(f"正在建立壓縮檔: {output_zip} ...\n")
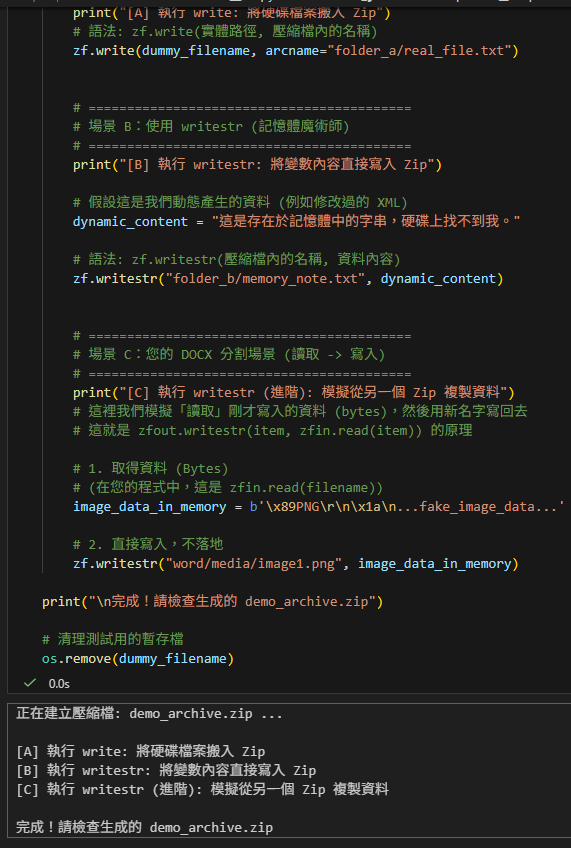
with zipfile.ZipFile(output_zip, 'w', zipfile.ZIP_DEFLATED) as zf:
# ==========================================
# 場景 A:使用 write (硬碟搬運工)
# ==========================================
print("[A] 執行 write: 將硬碟檔案搬入 Zip")
# 語法: zf.write(實體路徑, 壓縮檔內的名稱)
zf.write(dummy_filename, arcname="folder_a/real_file.txt")
# ==========================================
# 場景 B:使用 writestr (記憶體魔術師)
# ==========================================
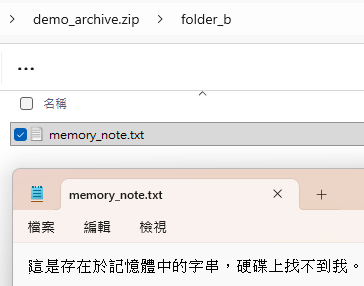
print("[B] 執行 writestr: 將變數內容直接寫入 Zip")
# 假設這是我們動態產生的資料 (例如修改過的 XML)
dynamic_content = "這是存在於記憶體中的字串,硬碟上找不到我。"
# 語法: zf.writestr(壓縮檔內的名稱, 資料內容)
zf.writestr("folder_b/memory_note.txt", dynamic_content)
# ==========================================
# 場景 C: DOCX 分割場景 (讀取 -> 寫入)
# ==========================================
print("[C] 執行 writestr (進階): 模擬從另一個 Zip 複製資料")
# 這裡我們模擬「讀取」剛才寫入的資料 (bytes),然後用新名字寫回去
# 這就是 zfout.writestr(item, zfin.read(item)) 的原理
# 1. 取得資料 (Bytes)
# (在您的程式中,這是 zfin.read(filename))
image_data_in_memory = b'\x89PNG\r\n\x1a\n...fake_image_data...'
# 2. 直接寫入,不落地
zf.writestr("word/media/image1.png", image_data_in_memory)
print("\n完成!請檢查生成的 demo_archive.zip")
# 清理測試用的暫存檔
os.remove(dummy_filename)輸出:
正在建立壓縮檔: demo_archive.zip …
[A] 執行 write: 將硬碟檔案搬入 Zip
[B] 執行 writestr: 將變數內容直接寫入 Zip
[C] 執行 writestr (進階): 模擬從另一個 Zip 複製資料
完成!請檢查生成的 demo_archive.zip
demo_archive.zip
深度解析:為什麼處理docx的程式碼必須用 writestr?
在分割docx.py 中,有這一段關鍵程式碼:
# zfin 是來源 Zip (舊 docx)
# zfout 是目標 Zip (新 docx)

# 從來源讀取資料 (變成記憶體中的 bytes)
data = zfin.read(item.filename)

# 直接寫入目標 (不需要存成暫存檔)
zfout.writestr(item, data)如果您堅持要用 write,流程會變成這樣(效率極差):
data = zfin.read(…) (讀到記憶體)
open(‘temp.tmp’, ‘wb’).write(data) (存到硬碟,超慢 I/O)
zfout.write(‘temp.tmp’, ‘filename’) (從硬碟讀取,再寫入 Zip)
os.remove(‘temp.tmp’) (刪除暫存檔)
結論:
write 是給檔案總管用的(把現有檔案打包)。
writestr 是給程式設計師用的(處理資料流、動態生成、XML 修改)。
在 DOCX/
XML 處理的世界裡,writestr 才是真正的主角。
推薦hahow線上學習python: https://igrape.net/30afN
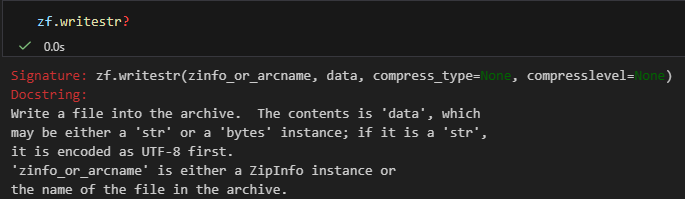
zf.writestr?
純文字版本:
Signature: zf.writestr(zinfo_or_arcname, data, compress_type=None, compresslevel=None)
Docstring:
Write a file into the archive. The contents is ‘data’, which may be either a ‘str’ or a ‘bytes’ instance; if it is a ‘str’, it is encoded as UTF-8 first.
‘zinfo_or_arcname‘ is either a ZipInfo instance or the name of the file in the archive.
File: zipfile.py
Type: method
部分程式碼:
        # --- Step E: 單次寫入 (Single Pass Write) ---
        # 若有需要更新的 .rels 內容 (new_doc_rels_content) 或有要刪除的孤兒檔案 (orphans):
        # 1. 開啟兩個 Zip:來源 (zfin) 與 暫存目標 (zfout)。
        # 2. 遍歷來源 Zip 的每個檔案:
        #    - 若是 document.xml.rels 且有新內容:寫入修改後的 XML (new_doc_rels_content)。
        #    - 若是孤兒檔案 (orphans):跳過不寫入 (即刪除)。
        #    - 其他檔案:直接從來源複製到目標。
        # 3. 最後用暫存檔覆蓋原始檔案。
        if new_doc_rels_content is not None or orphans:
            with tempfile.NamedTemporaryFile(suffix='.docx', delete=False) as tmpzip:
                tmp_zip_path = tmpzip.name

            with zipfile.ZipFile(copied_docx_path, 'r') as zfin, \
                 zipfile.ZipFile(tmp_zip_path, 'w', zipfile.ZIP_DEFLATED) as zfout:

                for item in zfin.infolist():
                    # item 如:
                    #<ZipInfo filename='word/_rels/document.xml.rels' compress_type=deflate file_size=121173 compress_size=6317>
                    if item.filename == doc_rels_path and new_doc_rels_content is not None:
                        # doc_rels_path = 'word/_rels/document.xml.rels'
                        zfout.writestr(doc_rels_path, new_doc_rels_content) # type: ignore
                        continue

                    if item.filename in orphans:
                        continue

                    zfout.writestr(item, zfin.read(item.filename))

shutil.move(tmp_zip_path, copied_docx_path)程式碼 zfout.writestr(item, zfin.read(item.filename)) 來解讀這段文件:
1. 第一個參數:zinfo_or_arcname
‘zinfo_or_arcname’ is either a ZipInfo instance or the name of the file in the archive.
- 用法:item (這是一個
ZipInfo物件,來自 zfin.infolist())。 - 為什麼這樣用最好?:
- 如果只傳字串檔名 (例如 ‘word/document.xml’),Python 會用預設值建立一個新的 ZipInfo,這會導致檔案權限 (Permissions) 和 時間戳記 (Timestamp) 變成當下時間。
- 如果您傳
ZipInfo物件 (即 item),Python 會完整保留原始檔案的所有屬性(例如:這個檔案原本是在 2023-10-01 建立的,複製過去後時間不會變)。這對於保持檔案的一致性非常重要。
2. 第二個參數:data
The contents is ‘data’, which may be either a ‘str’ or a ‘bytes’ instance
- 您的用法:zfin.read(item.filename) (這會回傳
bytes)。 - 細節:
- 如果是圖片 (
png,jpeg),讀出來就是bytes,直接寫入,沒問題。 - 如果是 XML (str),writestr 會貼心地幫您自動做
UTF-8編碼 (encoded as UTF-8 first),省去您自己 call .encode(‘utf-8’) 的麻煩。
- 如果是圖片 (
壓縮設定:compress_type
compress_type=None
- 您的用法:沒有指定這個參數。
- 結果:它會繼承您在開啟 Zip 時的設定 (zipfile.ZipFile(…, compression=zipfile.ZIP_DEFLATED))。
- 進階技巧:如果您傳入的是
ZipInfo物件 (item),writestr 會優先使用該物件裡記載的壓縮方式。這意味著如果原始檔案是「不壓縮儲存 (Stored)」,複製過去也會是「不壓縮」,完全忠於原味。
結論:您的程式碼寫法是「最佳實踐」
# 這是最完美的寫法:
# 1. 用 ZipInfo (item) 保留了檔案屬性與時間。
# 2. 用 read() 讀取 bytes 避免了編碼問題。
# 3. 用 writestr() 避免了硬碟 I/O。
zfout.writestr(item, zfin.read(item.filename))這行程式碼雖然短,但它做到了「高效」、「保真」且「簡潔」。
推薦hahow線上學習python: https://igrape.net/30afN
 ; 如何重置欄index? DataFrame的屬性與方法 .values ; .to_numpy()")
、ravel()與reshape(-1)的完整指南 #flatten(): 總是建立副本")
,52)")

, str(images_out_dir))")
計算終值?")
 ; result_broadcast = df.apply(func, axis=1, result_type=’broadcast’)")


![Excel TQC考題202: 快樂小學學生名冊,自訂格式:0″公斤”;[紅色]”減”0″公斤”;[藍色]”完美身材”](https://savingking.com.tw/wp-content/themes/hueman/assets/front/img/thumb-medium-empty.png)

近期留言