本教學將展示如何使用 `python-docx` 與 `lxml`,
深入 Word 文件的底層 XML 結構,
將文件中的圖片「完美手術」取出,並在原位置留下標記。
**教學流程:**
1. **環境準備**:自動生成一個包含圖片的 Word 測試檔 (使用 `PIL` 繪圖)。
2. **核心原理**:解析 Word XML 結構,尋找圖片容器。
3. **執行手術**:提取圖片 Blob、寫入硬碟、插入替代文字、移除原圖片容器。
4. **驗證結果**:檢查新生成的檔案。
### 0. 安裝必要套件
若您的環境尚未安裝,請取消註解並執行下方指令:
# !pip install python-docx pillow lxml
# 注意:正確的安裝名稱是 "python-docx" (PyPI 標準名稱),而不是 "docx"。
# "docx" 是一個已停止維護的舊套件,請勿安裝錯誤。
# 雖然在程式碼中 import 時是使用 "import docx",但安裝時需指定 "python-docx"。為了確保大家都能執行,我們先用 Python「畫」一張圖,並存成 Word 檔。
這裡我們會用到 `PIL` (Pillow) 來繪製簡單的圖形,並用 `python-docx` 建立文件。
import io
from pathlib import Path
from PIL import Image, ImageDraw
from docx import Document
from docx.shared import Inches
# 設定工作目錄
WORK_DIR = Path("D:/Temp/DocxDemo")
WORK_DIR.mkdir(parents=True, exist_ok=True)
test_docx_path = WORK_DIR / "demo_origin.docx"
def create_sample_docx(path):
doc = Document()
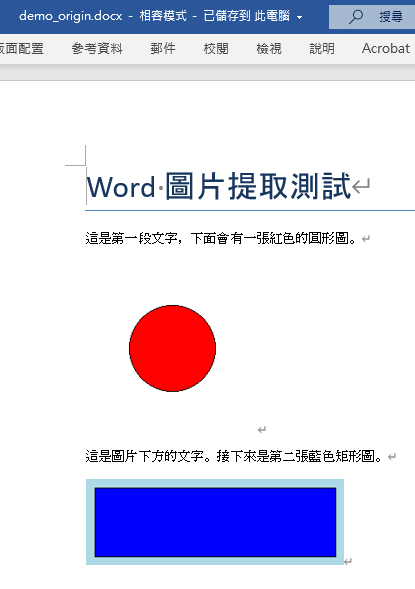
doc.add_heading('Word 圖片提取測試', 0)
doc.add_paragraph('這是第一段文字,下面會有一張紅色的圓形圖。')
# 1. 動態畫一張紅色的圓
img_byte_arr = io.BytesIO()
img = Image.new('RGB', (200, 200), color='white')
d = ImageDraw.Draw(img)
d.ellipse((50, 50, 150, 150), fill='red', outline='black')
img.save(img_byte_arr, format='PNG')
# 2. 插入圖片到 Word
doc.add_picture(img_byte_arr, width=Inches(2.0))
doc.add_paragraph('這是圖片下方的文字。接下來是第二張藍色矩形圖。')
# 3. 動態畫一張藍色的矩形
img_byte_arr2 = io.BytesIO()
img2 = Image.new('RGB', (300, 100), color='lightblue')
d2 = ImageDraw.Draw(img2)
d2.rectangle((10, 10, 290, 90), fill='blue', outline='black')
img2.save(img_byte_arr2, format='PNG')
doc.add_picture(img_byte_arr2, width=Inches(3.0))
doc.save(path)
print(f"測試檔案已建立:{path}")
create_sample_docx(test_docx_path)測試檔案已建立:D:\Temp\DocxDemo\demo_origin.docx
### 2. 核心邏輯:XML 解析與替換
這是本教學的精華。Word 的 `.docx` 本質上是 ZIP 壓縮的 XML 檔。
一般的 `python-docx` API 對於「讀取圖片位置」支援有限,
所以我們必須使用 `XPath` 直接操作底層 XML (`_element`)。
**關鍵技術點:**
* **搜尋 (`xpath`)**:使用 `.//w:drawing | .//w:pict` 找出圖片容器。
* **提取 (`rels`)**:透過 `r:embed` 屬性找到圖片的實體資料 (Blob)。
* **替換 (`addprevious` + `remove`)**:在圖片節點前插入文字,然後移除圖片節點。
document.xml:
2.1 [加強版] 深入解剖 Word XML 結構
為了精準控制,我們必須了解 Word 文件在 XML 層級的長相。
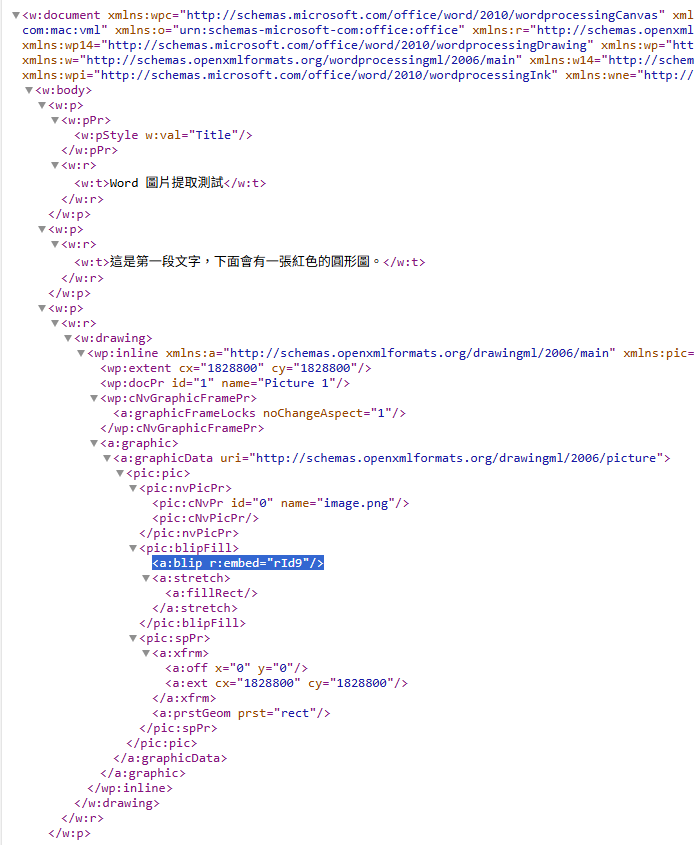
Word 文件基本上是由無數個 段落 (Paragraph) 與 奔跑 (Run) 組成的階層結構:
w:p(Paragraph): 代表一個段落。w:r(Run): 代表一段「連續且格式相同」的內容。這是文字和圖片的最小容器。w:t(Text): 存純文字的地方。w:drawing: 存放 DrawingML 物件(即我們看到的圖片、形狀)。
(注意:`w:t` 與 `w:drawing` 在 XML 結構中是
**同級的兄弟節點**,它們都是 `w:r` 的孩子)
典型的圖片結構圖解:
<w:p>  <!-- 段落 -->
  <w:r> <!-- Run 1: 可能放文字傳 -->
    <w:t>這裡是文字...</w:t>
  </w:r>
  <w:r> <!-- Run 2: 這裡放了圖片 -->
    <w:drawing> <!-- 圖片容器 (重點目標) -->
       <wp:inline>
          <a:graphic>
             <a:graphicData>
                <pic:pic>
                   <pic:blipFill>
                      <!-- r:embed 指向 rels 裡的實體檔案 ID -->
                      <a:blip r:embed="rId1" />
                   </pic:blipFill>
                </pic:pic>
             </a:graphicData>
          </a:graphic>
       </wp:inline>
    </w:drawing>
  </w:r>
</w:p>結論:我們要找的目標就是 <w:drawing> 或 <w:pict>(舊版 VML 格式),並取得藏在深處的 r:embed ID。
2.2 [加強版] XPath 語法與手術刀法
找到目標後,我們需要像外科醫師一樣精準切除。
1. 為什麼要用 |?
Python 的 lxml 支援標準 XPath 語法。為了相容新舊 Word 格式,我們使用「聯集 (Union)」運算子 |:
.//w:drawing:選取所有現代 DrawingML 圖片。.//w:pict:選取所有舊版 VML 圖片。- 指令:
xml_part.xpath('.//w:drawing | .//w:pict')(一次抓全)
2. 常見迷思:XPath 中的 > vs /
很多網頁工程師習慣 CSS Selector (div > span),但在 XPath 中:
- 階層選取 (Child):不能使用
>。必須使用/。- 錯:
.//w:r > w:drawing(語法錯誤或意義不同) - 對:
.//w:r/w:drawing(選取 w:r 底下的 w:drawing)
- 錯:
- 數值比較:
>在 XPath 僅用於數字比較。- 例:
@id > 5(當 ID 大於 5 時)
- 例:
3. 屬性搜尋 @
要取得 XML 標籤內的屬性值,使用 @ 符號:
.//@r:embed:搜尋任意層級下的embed屬性 (namespacer)..//@r:id:針對某些舊版結構,ID 屬性名稱可能不同。
4. 手術刀法 (lxml API)
當我們拿到 img_node (即 <w:drawing> 元素) 後:
- 定位父節點 (
w:r):parent = img_node.getparent()
(圖片是寄生在 Run 下面的,所以要對 Run 動手) - 建立替換組織 (
w:t):
我們手動建立一個<w:t><img>image.png</img></w:t>元素。 - 執行移植:
img_node.addprevious(t_node):在原本圖片 XML 節點的 前面 插入新的文字節點。parent.remove(img_node):把原本的圖片 XML 節點 移除。
這就是所謂的「完美置換術」!不破壞文件其餘結構,精準替換目標。
import sys
from docx import Document
from docx.oxml import OxmlElement
from docx.oxml.ns import qn

def extract_image_bytes(doc, rid):
    """從 doc.part.rels 取得圖片 bytes
    -> bytes|None
    """
    try:
        part = doc.part.rels[rid].target_part
        # 檢查是否為 ImagePart,避免抓到其他連結物件
        return part.blob if "ImagePart" in type(part).__name__ else None
    except Exception as e:
        print(f"Warning: Failed to extract rid={rid}, {e}")
        return None

def get_ext(image_bytes: bytes) -> str:
    """
    透過 Magic Number 判斷並回傳對應的副檔名。
    支援格式: JPG, PNG, BMP, GIF, ICO, TIFF, WEBP
    """
    if not image_bytes: return ".img"

    # 1. JPEG/JPG: FF D8 FF
    if image_bytes.startswith(b'\xff\xd8'):
        return ".jpg"

    # 2. PNG: 89 50 4E 47 0D 0A 1A 0A
    elif image_bytes.startswith(b'\x89PNG\r\n\x1a\n'):
        return ".png"

    # 3. BMP: BM (Windows Bitmap)
    elif image_bytes.startswith(b'BM'):
        return ".bmp"

    # 4. GIF: GIF87a or GIF89a
    elif image_bytes.startswith(b'GIF8'):
        return ".gif"

    # 5. ICO: 00 00 01 00 (Icon)
    elif image_bytes.startswith(b'\x00\x00\x01\x00'):
        return ".ico"

    # 6. TIFF (Intel-little endian): II* (49 49 2A 00)
    elif image_bytes.startswith(b'II*\x00'):
        return ".tiff"

    # 7. TIFF (Motorola-big endian): MM\0* (4D 4D 00 2A)
    elif image_bytes.startswith(b'MM\x00*'):
        return ".tiff"

    # 8. WebP: RIFF ... WEBP (需要檢查 offset)
    # 這裡做簡單檢查:前四個是 RIFF,且第 8-12 是 WEBP
    elif image_bytes.startswith(b'RIFF') and image_bytes[8:12] == b'WEBP':
        return ".webp"

    # 預設
    return ".img"


def process_docx_images(file_path):
    print(f"正在處理: {file_path.name}")
    doc = Document(str(file_path))

    # 輸出設定
    base_stem = file_path.stem
    output_dir = file_path.parent / "extracted_images"
    output_dir.mkdir(exist_ok=True, parents=True)

    img_counter = 0

    # 1. 取得 XML Body (正文區塊)
    body = doc.element.body

    # 2. 使用 XPath 搜尋所有 graphic container (w:drawing 或 w:pict)
    # 這是最穩定的搜尋方式,不依賴 namespace map
    image_tags = body.xpath('.//w:drawing | .//w:pict')

    for img_node in image_tags:
        # 此時的 img_node 是一個 <w:drawing> 或 <w:pict> 的元素 (BaseOxmlElement)
        # 它是 python-docx 對 lxml 的封裝,雖然有 .xpath() 方法,但行為與標準 lxml 略有不同
        # (例如:它不接受 namespaces 參數,而是使用內建的 ns map)

        # 3. 找出該容器內所有參照的資源 ID (r:embed 或 r:id)
        # 使用寬鬆搜尋策略,適用性最高
        rids = img_node.xpath('.//@r:embed | .//@r:id')
        #找到 <a:blip r:embed="rId9"/> ,取出 "rId9"
        rids = list(dict.fromkeys(rids)) # 去重且保留順序

        found_any = False
        placeholder_texts = []

        for rid in rids:
            blob = extract_image_bytes(doc, rid)
            if blob:
                img_counter += 1
                ext = get_ext(blob)

                # 存檔
                img_filename = f"{base_stem}__img{img_counter:02d}{ext}"
                save_path = output_dir / img_filename
                with open(save_path, "wb") as f:
                    f.write(blob)

                print(f"  -> 圖片已匯出: {img_filename}")
                placeholder_texts.append(f"<img>{img_filename}</img>")
                found_any = True

        # 4. 若有提取到圖片,則執行替換手術
        if found_any:
            # 取得父節點 (通常是 w:r Run)
            parent = img_node.getparent()

            if parent is not None:
                # 建立新的文字節點 <w:t>
                full_text = "\n".join(placeholder_texts)
                t_node = OxmlElement('w:t')
                t_node.text = full_text

                # 手術動作 A: 在圖片容器「前」插入文字
                img_node.addprevious(t_node)

                # 手術動作 B: 移除圖片容器
                parent.remove(img_node)

    # 5. 儲存結果
    out_docx = output_dir / f"{base_stem}__replaced.docx"
    doc.save(str(out_docx))
    print(f"處理完成!新文件儲存於: {out_docx}")
    return out_docx, output_dir

# 執行函式
replaced_docx, img_dir = process_docx_images(test_docx_path) ### 3. 結果驗證
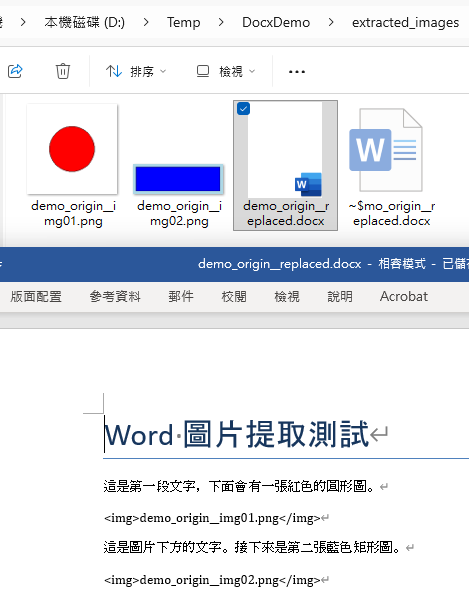
檢查輸出的結果。我們應該會看到:
1. 原始圖片已經被存成獨立的 `.png` 檔案。
2. 開啟新的 `.docx` 檔案時,原位置的圖片變成了 `<img…>` 的文字串。
# 列出產生的檔案
print("輸出目錄內容:")
for f in img_dir.glob("*"):
    print(f" - {f.name}")

# 簡易驗證 Word 內容 (讀取文字)
new_doc = Document(replaced_docx)
print("\n新文件內容預覽:")
print("-" * 30)
for p in new_doc.paragraphs:
    print(p.text)
print("-" * 30)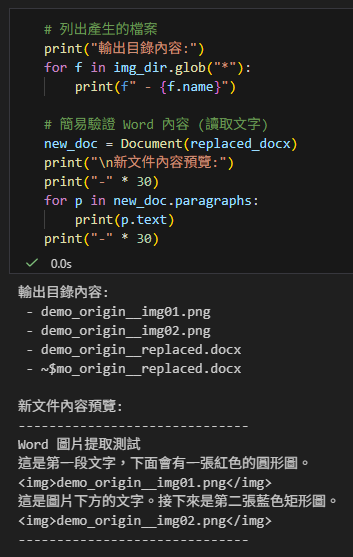
推薦hahow線上學習python: https://igrape.net/30afN
![Python 打造高容錯搜尋引擎:BM25、Bigram 與difflib自動糾錯實戰; from rank_bm25 import BM25Okapi ; bm25 = BM25Okapi(corpus_tokens) #corpus_tokens: list[list[str]]](https://i1.wp.com/savingking.com.tw/wp-content/uploads/2026/02/20260209150527_0_a24c17.png?quality=90&zoom=2&ssl=1&resize=350%2C233 "Python 打造高容錯搜尋引擎:BM25、Bigram 與difflib自動糾錯實戰; from rank_bm25 import BM25Okapi ; bm25 = BM25Okapi(corpus_tokens) #corpus_tokens: list[list[str]]")
 as file: for line in file: for w in line.split()")
 教學:sys._getframe(1) vs inspect.currentframe().f_back # inspect.currentframe() 先拿到自己,再 .f_back 到 caller;等價於 sys._getframe(1)")


 對二進位數據打包、解包 data = struct.pack (format_str, 1, 2, 3.14) ; result = struct.unpack (format_str, data) ; numpy.fromfile() ;")
, Null (null), Object(對應python的dict), Array(對應python的list); Python如何讀取json檔?")

 ; Python的命名慣例: 全大寫表示常數,首字大寫表示Class")


近期留言