code:
"""
資料來源:
https://realpython.com/python-speech-recognition/
pip install sounddevice
pip install scipy
pip install pyaudio # 注意 要安裝喔!
pip install soundfile
pip install SpeechRecognition
"""
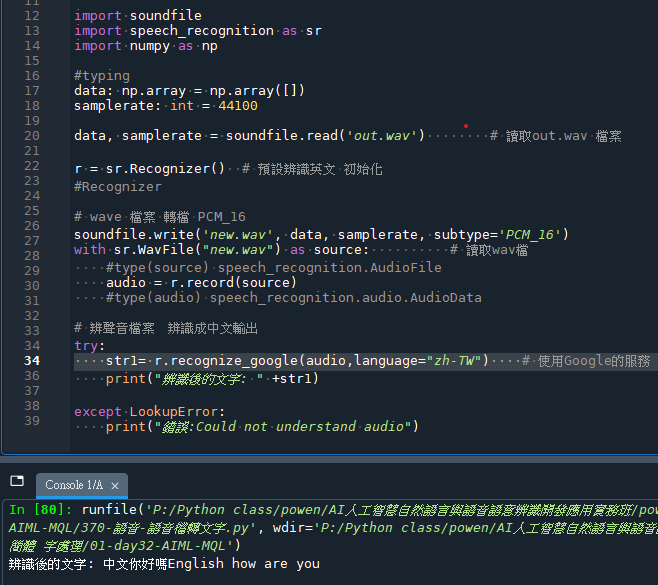
import soundfile
import speech_recognition as sr
import numpy as np
#typing
data: np.array = np.array([])
samplerate: int = 44100
data, samplerate = soundfile.read('out.wav') # 讀取out.wav 檔案
r = sr.Recognizer() # 預設辨識英文 初始化
#Recognizer
# wave 檔案 轉檔 PCM_16
soundfile.write('new.wav', data, samplerate, subtype='PCM_16')
with sr.WavFile("new.wav") as source: # 讀取wav檔
#type(source) speech_recognition.AudioFile
audio = r.record(source)
#type(audio) speech_recognition.audio.AudioData
# 辨聲音檔案 辨識成中文輸出
try:
str1= r.recognize_google(audio,language="zh-TW") # 使用Google的服務
print("辨識後的文字: " +str1)
except LookupError:
print("錯誤:Could not understand audio")
輸出結果:
腳本將數據以 PCM_16 的特定子類型寫回一個新的 WAV 文件 new.wav。然後使用 speech_recognition 打開並讀取這個 WAV 文件。但如果 out.wav 已經是speech_recognition可以讀取的格式,這個步驟可能是多余的,除非你需要確保文件格式或子類型的特定要求。
推薦hahow線上學習python: https://igrape.net/30afN
")
![Python: 如何判斷字符串內容是否為數字(整數或浮點數)? isinstance( eval( entry.get() ), (float, int) ) ; str.isdigit() #不包括小數點和負號 ; try~ except ValueError~ ; 正則表示法 regular expression ; pattern = ‘^[-+]?[0-9]*\.?[0-9]+([eE][-+]?[0-9]+)?$’](https://i0.wp.com/savingking.com.tw/wp-content/uploads/2023/05/20230512152430_3.png?quality=90&zoom=2&ssl=1&resize=350%2C233 "Python: 如何判斷字符串內容是否為數字(整數或浮點數)? isinstance( eval( entry.get() ), (float, int) ) ; str.isdigit() #不包括小數點和負號 ; try~ except ValueError~ ; 正則表示法 regular expression ; pattern = ‘^[-+]?[0-9]*\.?[0-9]+([eE][-+]?[0-9]+)?$’")
")

; 對於np.bool_ 做乘法等效於and ; 對於np.bool_ 做加法等效於or")

 ; hex() or bin() #轉為16 or 2進位數字,會省略前導0")


近期留言