在處理 Word (.docx) 或 Excel (.xlsx) 的底層結構時,
我們常會看到像「壓縮餅乾」一樣擠成一團的 XML 內容。
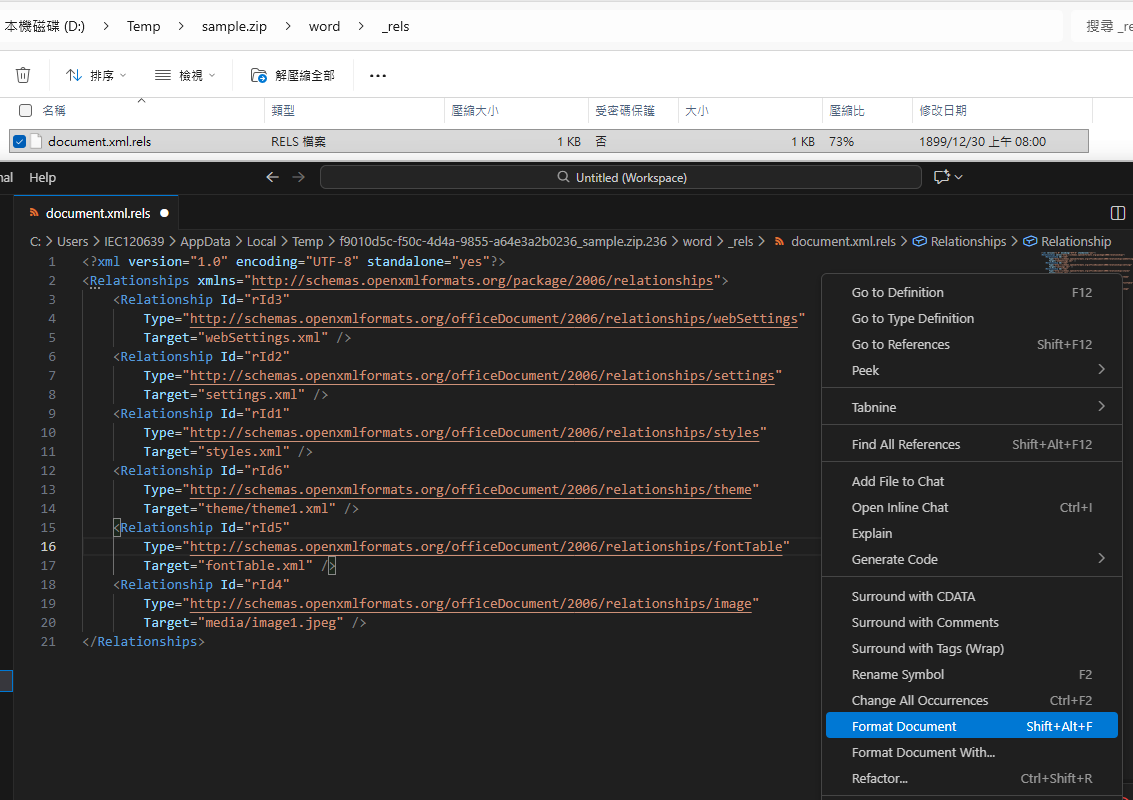
雖然使用 VS Code (Shift+Alt+F) 可以一鍵讓它變得賞心悅目,
但如果我們是在寫 Python 自動化腳本,
該怎麼讓輸出的檔案也擁有一樣漂亮的縮排呢?
Python 強大的 lxml 函式庫中的 pretty_print=True 參數,
就是程式碼界的「格式化文件」按鈕。
準備工作
首先,確保您的環境中已安裝 lxml。
它比 Python 內建的 xml 模組更快、功能更強大。
pip install lxml實戰教學:還原 document.xml.rels
假設我們有一個剛從 Word 解壓縮出來的 document.xml.rels 檔案,
內容擠在同一行。
我們目標是將其讀取並轉換為易讀格式。
核心程式碼
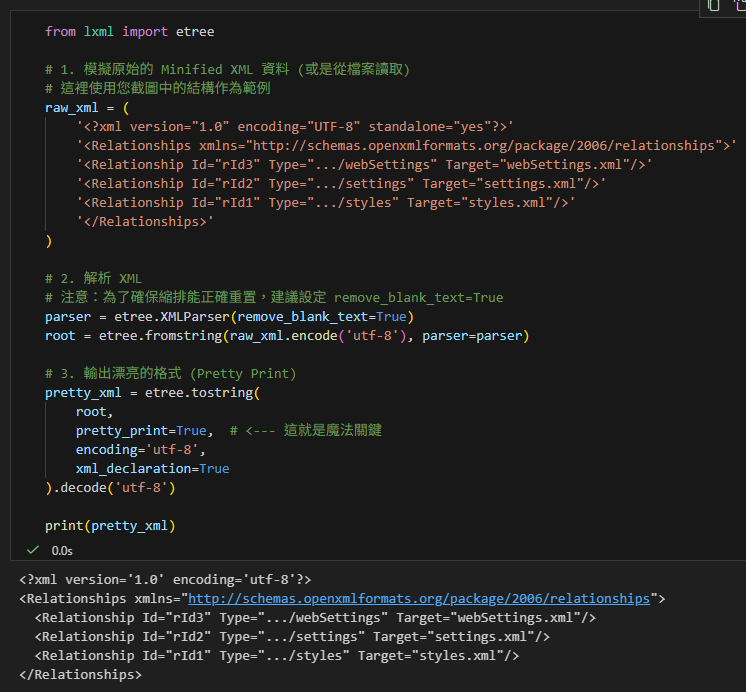
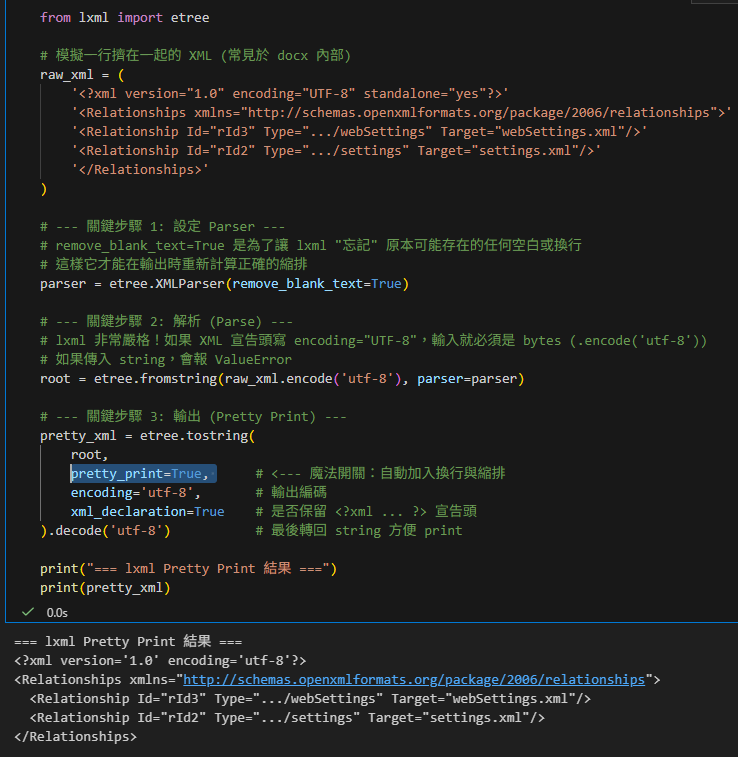
from lxml import etree

# 1. 模擬原始的 Minified XML 資料 (或是從檔案讀取)
# 這裡使用截圖中的結構作為範例
raw_xml = (
    '<?xml version="1.0" encoding="UTF-8" standalone="yes"?>'
    '<Relationships xmlns="http://schemas.openxmlformats.org/package/2006/relationships">'
    '<Relationship Id="rId3" Type=".../webSettings" Target="webSettings.xml"/>'
    '<Relationship Id="rId2" Type=".../settings" Target="settings.xml"/>'
    '<Relationship Id="rId1" Type=".../styles" Target="styles.xml"/>'
    '</Relationships>'
)

# 2. 解析 XML
# 注意:為了確保縮排能正確重置,建議設定 remove_blank_text=True
parser = etree.XMLParser(remove_blank_text=True)
root = etree.fromstring(raw_xml.encode('utf-8'), parser=parser)

# 3. 輸出漂亮的格式 (Pretty Print)
pretty_xml = etree.tostring(
    root,
    pretty_print=True,  # <--- 這就是魔法關鍵
    encoding='utf-8',
    xml_declaration=True
).decode('utf-8')

print(pretty_xml)輸出:
進階技巧:直接處理檔案
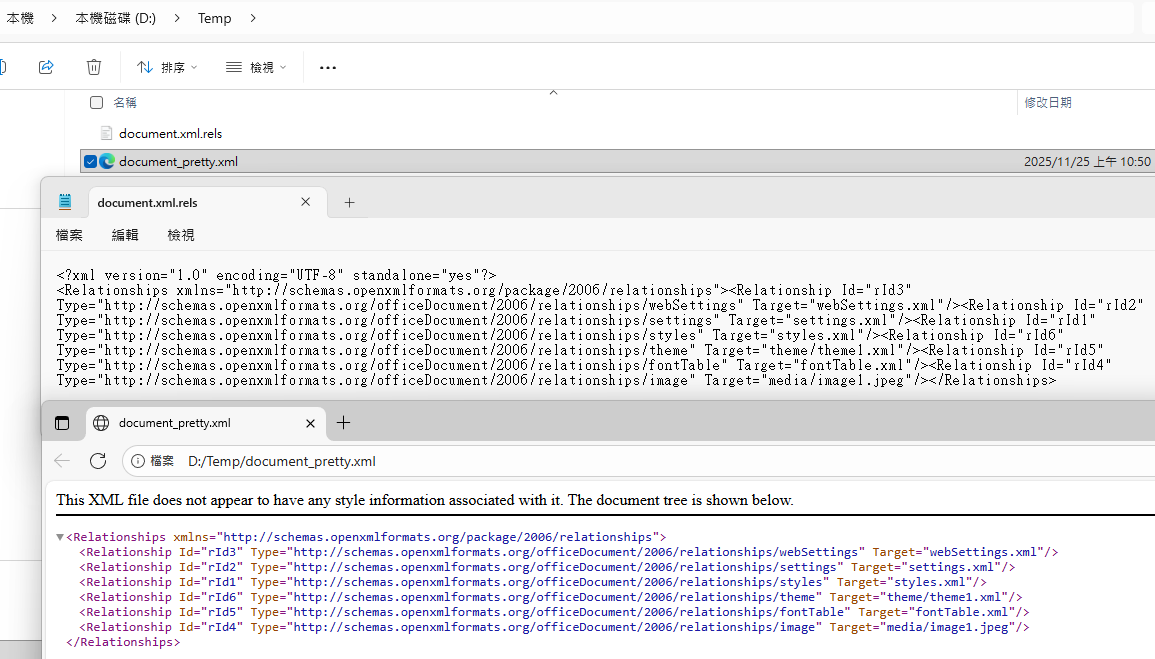
如果您想直接讀取硬碟中的 document.xml.rels 並另存為格式化後的新檔,
可以使用 ElementTree 物件的操作方式:
from lxml import etree

input_file = 'document.xml.rels'
output_file = 'document_pretty.xml'

# 讀取檔案 (同樣建議移除既有的空白,以免干擾排版)
parser = etree.XMLParser(remove_blank_text=True)
tree = etree.parse(input_file, parser)

# 寫入新檔,並開啟 pretty_print
tree.write(
    output_file,
    pretty_print=True,
    encoding='utf-8',
    xml_declaration=True
)

print(f"轉換完成!請查看 {output_file}")輸出:
為什麼有時候 pretty_print 會失效?
很多新手會發現設了 True 卻沒反應。
這通常是因為原始 XML 中夾雜了原本的「換行符」或「空白」。lxml 會認為這些空白是文字內容的一部分,因此不敢隨意更動縮排。
解決方案:
如範例所示,在解析時加上 parser = etree.XMLParser(remove_blank_text=True),
告訴解析器:「忽略那些無意義的空白,全部由我重新排版!」
總結
- 手動查看:使用 VS Code (
Shift+Alt+F) 最快。 - 程式處理:使用 Python
lxml搭配pretty_print=True。
掌握這個技巧,無論是在 Debug 還是生成報表,
您的 XML 檔案都能保持專業且整潔的結構。
推薦hahow線上學習python: https://igrape.net/30afN
進階教學:關於 encoding='unicode' 與 xml_declaration=False
在 Python 3 的環境下開發時,
您會發現上述程式碼有一個小小的「累贅」動作:tostring(...).decode('utf-8')。
lxml 的 tostring 函式預設行為是產生 Bytes(二進位資料),
這是為了方便直接寫入檔案。
但如果您的目的是在程式內部處理字串
(例如存入資料庫、Regex 比對、或是單純 print 出來除錯),
使用 encoding='unicode' 會是更 Pythonic(符合 Python 風格)的做法。
以下是詳細解析:
1. 傳統寫法 vs. Pythonic 寫法
傳統寫法 (Bytes 轉 String):
這是原本的寫法,先轉成 bytes 再解碼。
# 產出 bytes,然後手動 decode
xml_bytes = etree.tostring(root, encoding='utf-8')
xml_str = xml_bytes.decode('utf-8')Pythonic 寫法 (直接產出 String):
直接告訴 lxml 我要的是 Python 的字串物件(Unicode)。
# 直接產出 str
xml_str = etree.tostring(root, encoding='unicode')2. 為什麼這通常搭配 xml_declaration=False?
當您設定 encoding='unicode' 時,通常建議同時設定 xml_declaration=False,原因如下:
- 邏輯上的矛盾:
XML 宣告中的encoding='UTF-8'是用來告訴解析器「這個檔案的Bytes是如何排列的」。
但如果您將encoding設為'unicode',回傳的是 Python 內部的字串物件(抽象的字符),此時它還沒有被編碼成具體的 Bytes。如果在一個 Python 字串開頭寫encoding='UTF-8',雖然語法上不一定報錯(手動拼接字串),但在邏輯上是沒有意義的,因為它現在是記憶體中的物件,不是檔案流。
在lxml中,encoding='unicode'與xml_declaration=True是互斥的,程式會直接 Crash,而不是僅僅「邏輯上無意義」。 - 字串處理的便利性:
在記憶體內處理字串時,那個<?xml ...?>頭通常只是干擾。使用encoding='unicode'的情境通常就是為了字串處理,因此把頭去掉能讓字串更乾淨。
為什麼會報錯?(技術原理)
ValueError: Serialisation to unicode must not request an XML declaration
這個錯誤訊息非常直白:「序列化為 Unicode 時,不可要求 XML 宣告。」
這背後的原因是 XML 宣告(XML Declaration)的本質與 Python 字串(Unicode) 存在根本性的衝突:
- XML 宣告的作用:例如
<?xml version='1.0' encoding='UTF-8'?>,這行字的主要目的是告訴接收者:「接下來的內容是一串 Bytes(位元組),請使用 UTF-8 編碼表將其解碼為字符。」 - encoding=’unicode’ 的作用:這告訴
lxml不要進行編碼(Encode),直接回傳 Python 內部的抽象字符物件(str)。
衝突點:
如果您要求 lxml 回傳一個 Python str(未編碼的抽象字符),卻又要求它加上一個 XML 宣告說「我是 UTF-8 編碼」,這就是說謊。因為這個 Python str 在記憶體中並不是 UTF-8 Bytes。
lxml 為了防止開發者產出這種「自我矛盾」的無效 XML 資料,因此在程式碼層面直接阻擋了這種組合。
3. 實戰範例
如果您只是想在 Console 印出來檢查結構,或是要將 XML 片段插入另一個大的 XML 中,這是最推薦的寫法:
# 乾淨、直接,回傳的是 str 類型
clean_xml_str = etree.tostring(
    root,
    pretty_print=True,
    encoding='unicode',       # 直接回傳字串,不用再 .decode()
    xml_declaration=False     # 既然是內部字串,就不需要宣告頭
)

print(type(clean_xml_str))    # <class 'str'>
print(clean_xml_str)輸出:
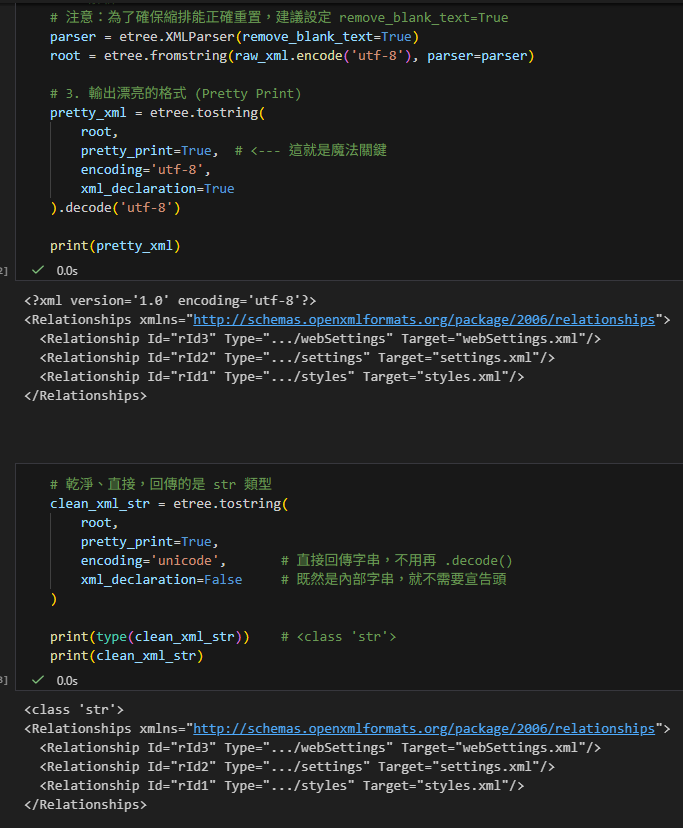
注意clean_xml_str最開頭少了:
<?xml version=’1.0′ encoding=’utf-8′?>
總結對照表
在 Python 程式碼運作中:
您可以放心地使用 xml_declaration=False,讓字串乾淨一點,
方便除錯或比對字串。
在最後存檔/輸出時:
如果是要寫回 .xml 檔案(特別是給 Word/Excel 用),
請務必在 tostring 時把 xml_declaration=True 加回去,
或是手動在字串最前面補上 <?xml version='1.0' encoding='utf-8'?>。
推薦hahow線上學習python: https://igrape.net/30afN
Python XML 實戰教學:從雜亂無章到井然有序 (lxml vs ElementTree)
在處理 Word (.docx) 或 Excel (.xlsx) 的底層 XML 時,我們最常遇到的情況就是:所有的 XML 都擠在同一行(Minified XML)。這對於程式來說讀取很快,但對於人類除錯(Debugging)來說簡直是惡夢。
本篇教學將延伸您提供的 lxml 範例,深入探討如何「漂亮列印 (Pretty Print)」XML,並比較 lxml 與 Python 內建 xml.etree.ElementTree 的差異與陷阱。
1. 強大的第三方王者:lxml
您剛才提供的程式碼是使用 lxml 進行格式化的標準起手式。讓我們拆解其中的關鍵細節,特別是那些容易被忽略的參數。
完整範例代碼
from lxml import etree

# 模擬一行擠在一起的 XML (常見於 docx 內部)
raw_xml = (
    '<?xml version="1.0" encoding="UTF-8" standalone="yes"?>'
    '<Relationships xmlns="http://schemas.openxmlformats.org/package/2006/relationships">'
    '<Relationship Id="rId3" Type=".../webSettings" Target="webSettings.xml"/>'
    '<Relationship Id="rId2" Type=".../settings" Target="settings.xml"/>'
    '</Relationships>'
)

# --- 關鍵步驟 1: 設定 Parser ---
# remove_blank_text=True 是為了讓 lxml "忘記" 原本可能存在的任何空白或換行
# 這樣它才能在輸出時重新計算正確的縮排
parser = etree.XMLParser(remove_blank_text=True)

# --- 關鍵步驟 2: 解析 (Parse) ---
# lxml 非常嚴格!如果 XML 宣告頭寫 encoding="UTF-8",輸入就必須是 bytes (.encode('utf-8'))
# 如果傳入 string,會報 ValueError
root = etree.fromstring(raw_xml.encode('utf-8'), parser=parser)

# --- 關鍵步驟 3: 輸出 (Pretty Print) ---
pretty_xml = etree.tostring(
    root,
    pretty_print=True,      # <--- 魔法開關:自動加入換行與縮排
    encoding='utf-8',       # 輸出編碼
    xml_declaration=True    # 是否保留 <?xml ... ?> 宣告頭
).decode('utf-8')           # 最後轉回 string 方便 print

print("=== lxml Pretty Print 結果 ===")
print(pretty_xml)
為什麼需要 remove_blank_text=True?
如果原始 XML 不是完全的一行,而是混雜了一些不規則的換行或空白,lxml 預設會保留這些「原始空白」。這會導致 pretty_print=True 失效(因為它認為你已經有排版了)。加上這個參數等於是告訴 lxml:「忽略原本所有的排版,全部由你重新安排」。
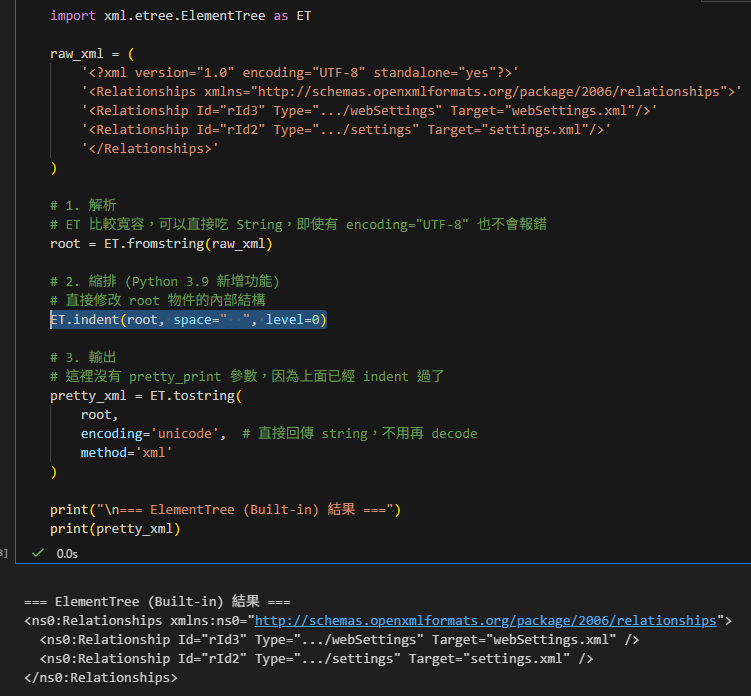
2. 內建標準庫:xml.etree.ElementTree (Python 3.9+)
如果您不想安裝 lxml,或者希望腳本依賴越少越好,Python 3.9 之後的標準庫也支援了縮排功能,但寫法完全不同。
寫法差異
內建庫沒有 pretty_print 參數,而是提供了一個獨立的函數 ET.indent() 來修改樹狀結構。
import xml.etree.ElementTree as ET

raw_xml = '...' # 同上

# 1. 解析
# ET 比較寬容,可以直接吃 String,即使有 encoding="UTF-8" 也不會報錯
root = ET.fromstring(raw_xml)

# 2. 縮排 (Python 3.9 新增功能)
# 直接修改 root 物件的內部結構
ET.indent(root, space="  ", level=0)

# 3. 輸出
# 這裡沒有 pretty_print 參數,因為上面已經 indent 過了
pretty_xml = ET.tostring(
    root,
    encoding='unicode',  # 直接回傳 string,不用再 decode
    method='xml'
)

print("\n=== ElementTree (Built-in) 結果 ===")
print(pretty_xml)
3. lxml vs ElementTree:該選誰?
在處理 Word/Office XML 時,這兩者各有優劣:
| 特性 | lxml | xml.etree.ElementTree |
|---|---|---|
| 安裝 | 需 pip install lxml |
內建 (Standard Library) |
| 輸入格式 | 嚴格:有 Header 必須給 Bytes | 寬容:String/Bytes 通吃 |
| 漂亮列印 | tostring(..., pretty_print=True) |
ET.indent(root) (Py3.9+) |
| 容錯能力 | 強:可用 HTMLParser 修復爛標籤 |
弱:格式錯誤直接報錯 |
| XPath 支援 | 完整:支援 //w:p[w:r/w:t='text'] |
有限:語法支援較少 |
| 命名空間 | 處理 nsmap 非常方便 |
處理 {url}tag 較為繁瑣 |
實戰建議 (針對您的 docx 分割器專案)
- 簡單讀寫 (
.rels):使用 ElementTree。因為.rels結構簡單,且您的腳本已經將 zip 內容讀成 string 了,ET 不會因為編碼宣告報錯,整合最順手。 - 複雜分析 (
document.xml):如果未來需要大量搜尋特定節點(如「找出所有紅色字體的段落」),lxml 的 XPath 效能與語法會讓開發輕鬆很多。 - 除錯 (Debugging):當您想把 XML 印出來看時,lxml 的
pretty_print通常比ET.indent產生的結果更美觀(特別是屬性很多的標籤)。
4. 常見陷阱:ValueError: Unicode strings...
這是新手使用 lxml 最常遇到的錯誤。
- 錯誤代碼:
xml_str = '<?xml version="1.0" encoding="UTF-8"?><root>Hi</root>' root = etree.fromstring(xml_str) # 爆炸! - 錯誤訊息:
ValueError: Unicode strings with encoding declaration are not supported. Please use bytes input or XML fragments without declaration. - 原因:
XML 宣告說它是 UTF-8,但你傳給 Python 的是已經解碼過的 Unicode String。lxml覺得這是一種矛盾(既然已經是 String,就不該有編碼宣告)。 - 解法:
- 傳入 Bytes:
etree.fromstring(xml_str.encode('utf-8')) - 或者,去掉宣告頭再傳入。
- 傳入 Bytes:
希望這篇教學能幫助您更清楚掌握 Python 處理 XML 的眉角!在您的 split_iec_diagnostics_04.py 中,目前的 ET 用法是非常穩健的選擇。
推薦hahow線上學習python: https://igrape.net/30afN
from lxml import etree
import xml.etree.ElementTree as ET
與tuple, set, issubset(), issuperset()")

, chr(), list(str)會把字串的每一個字母拆分進入list中,string跟list都可以使用index定位,沒有非要將string轉為list, for i in str: i 也可以依序代入str的每一個chr")
 駝峰切詞與特例保護教學; (?i: … ):不分大小寫的非捕獲群組")
套件處理pdf文件?如何搜尋有指定標題的頁面,抓取該頁的所有圖片?")

的函式.rfind() .replace() 切片與串接; 如何尋找直欄中,含有特定關鍵字的列數? pandas.Series.str.contains(“Hz”) ;如何將Series中的內容去掉首末的空格並小寫? pandas.Series .str.strip() .str.lower() #需要兩次.str")
,但.5GHZ的.不split()? parts = filename.rsplit(“.”, 1) ; 使用正則表示法parts = re.split(r”\.(?!\d)”, filename) ; os.path.splitext(filename)")

![Python TQC考題910 學生基本資料, print(line.decode("utf-8")), if line.decode("utf-8").split()[2] =="0": female += 1 - 儲蓄保險王](https://savingking.com.tw/wp-content/uploads/2022/05/20220514163621_72-520x245.png)


近期留言